Two Ways to Add Avalanche Network / Token in Metamask
Avalanche(AVAX) is a blockchain platform and a cryptocurrency token that has some advantages over the Ethereum network. Metamask supports working with the AVAX tokens by adding the Avalanche network. Here is a quick guide on how to add the Avalanche network to the MetaMask wallet on the computer.Method 1: Adding from the popular networks
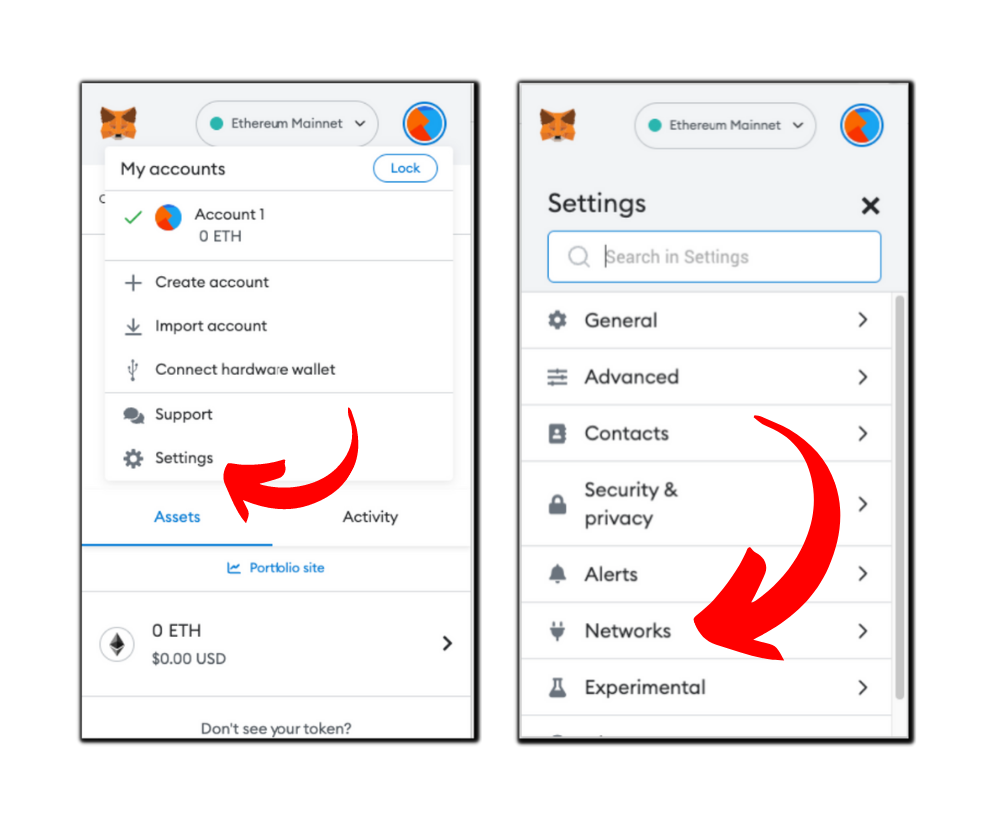
- First, open the MetaMask extension and click on the profile icon in the top right corner of the extension UI. I am assuming that you have already set up the MetaMask account. If you did not, you can do that with the help of this article.
- By clicking on the settings icon in this menu, you will move to the MetaMask settings. Here, choose the networks option, and you will be able to see all the default networks and the ones you added in MetaMask. You can add any supported network from here. We have a tutorial on how to add a Binance network in MetaMask. You can find that here.
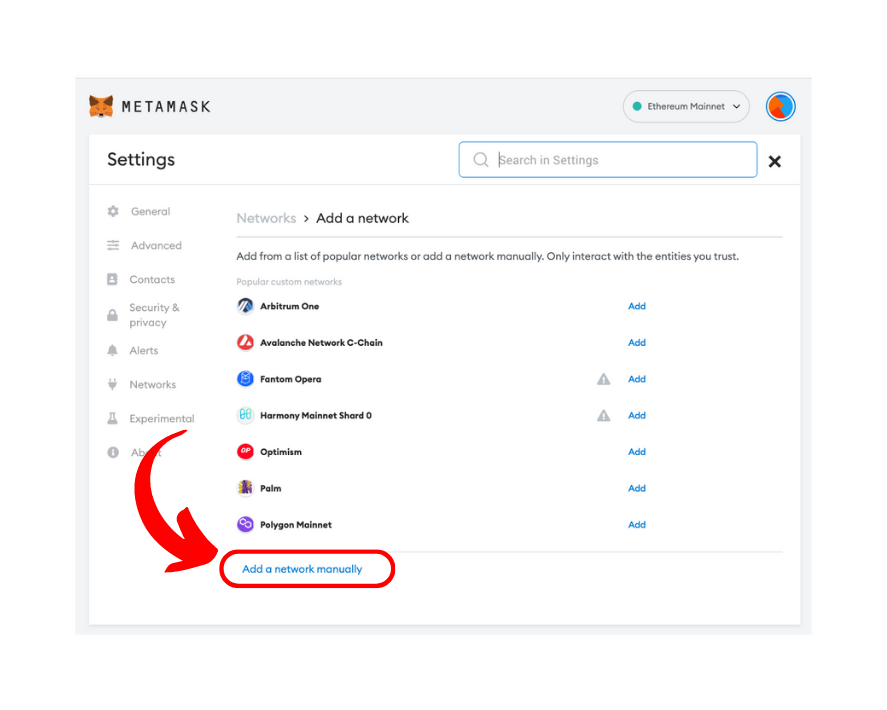
- We need to select the “Add network” option from here. It will open a new browser window with the MetaMask settings. And the page you see here would be of the Network settings. If you don’t get redirected to the network settings here. You can always come to it by going to General>Networks>Add Network.
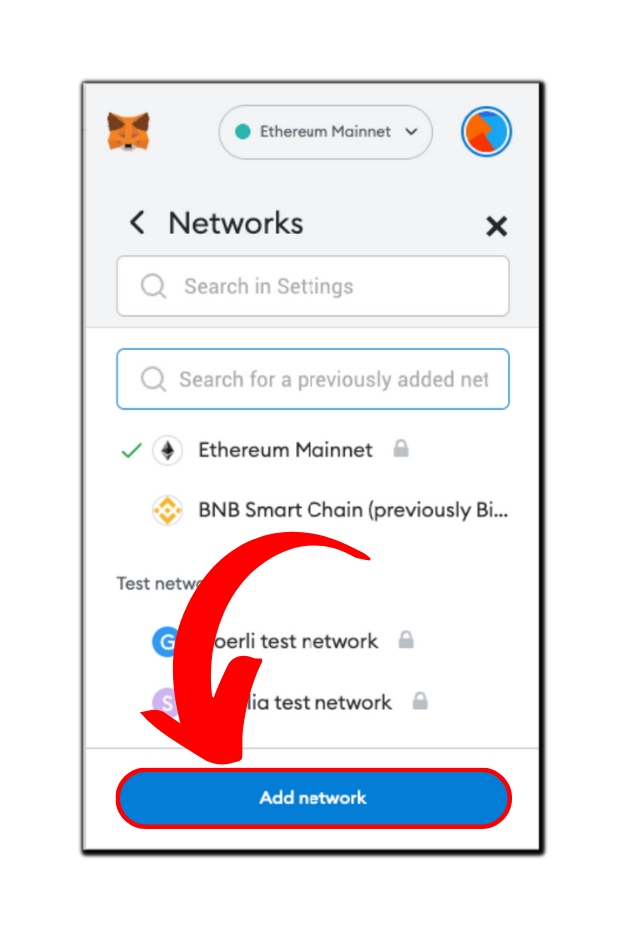
- In the networks section. If you see the “Avalanche Network C-Chain” in the popular networks section. Just click on the add button next to it.
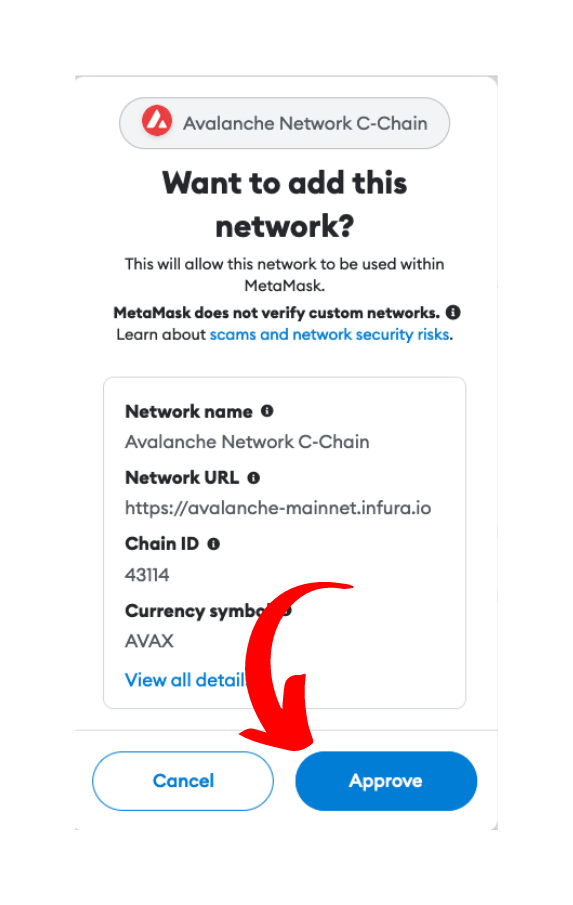
- The extension will fill in the network details next to it and ask for your approval. Clicking on the “Approve” button will greet you with another popup that confirms the addition of the Avalanche Network to the MetaMask extension.
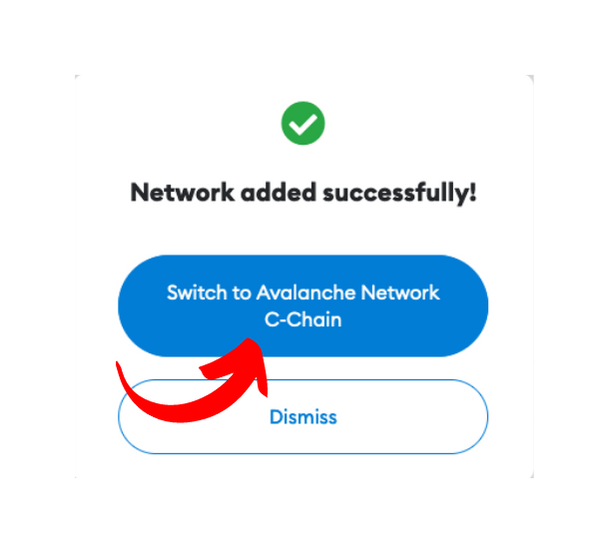
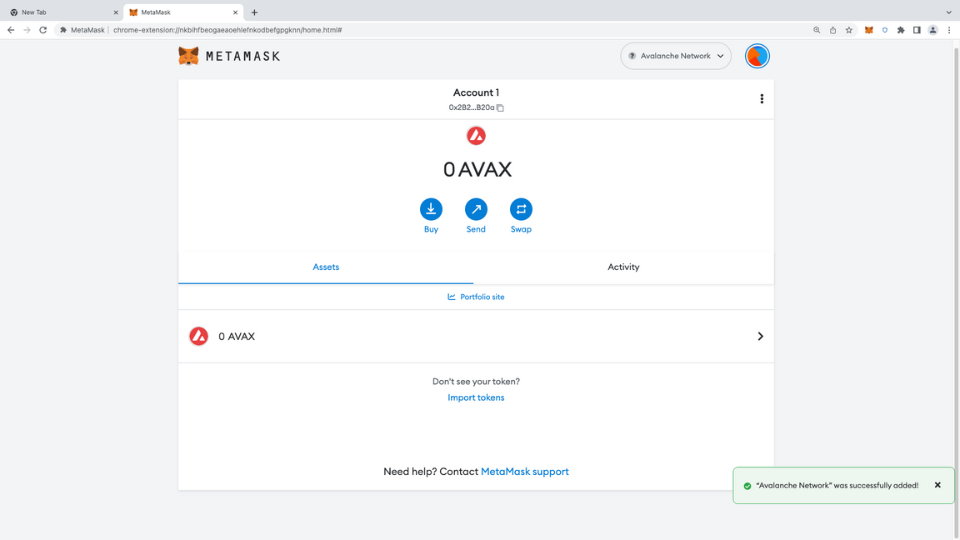
- Click on the switch option to start using Avalanche in the MetaMask browser extension.

Method 2: Manually adding the network
If this method doesn’t work for you or if you want to manually add the Avalanche network for any reason, here is another way to do it.
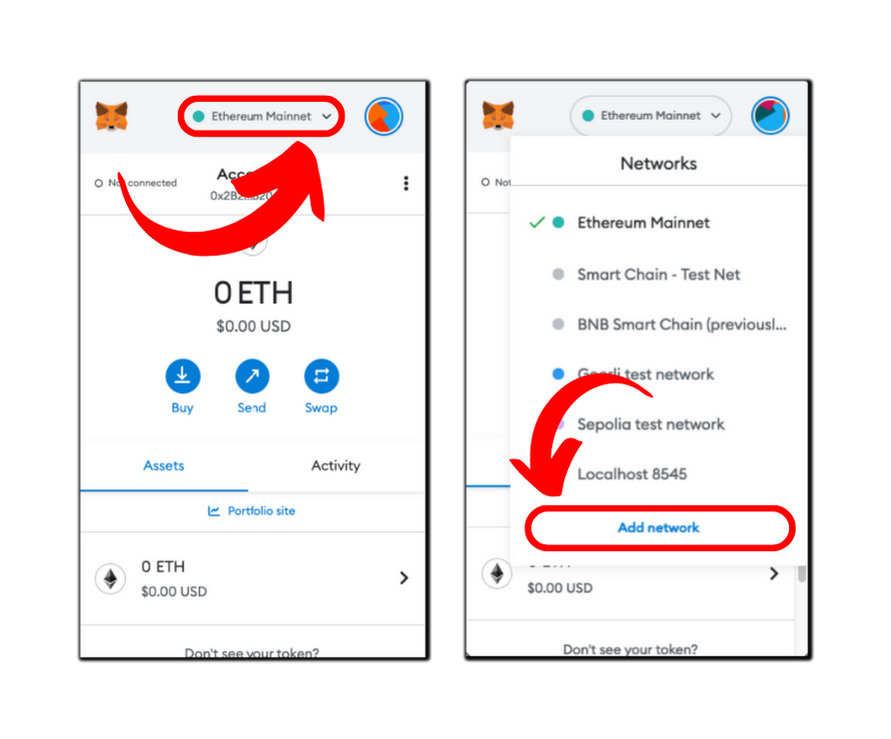
- Head to the network settings. (Quick tip: You can navigate to the network settings directly by clicking on the default network you see on the top-center of the MetaMask extension and choosing the “Add network” button at the bottom from its settings”)
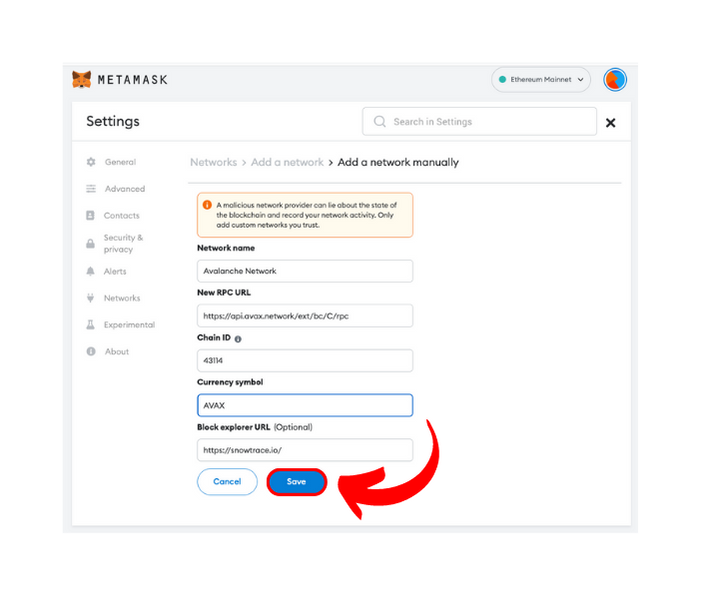
- But select the “Add network manually” option this time. It will open a form in the next menu. Fill it with the details given below and click on the save button.
- Congratulations! You have successfully added the Avalanche Network in MetaMask. Find out how to start buying, selling, and interacting with the Avalanche network with this article.
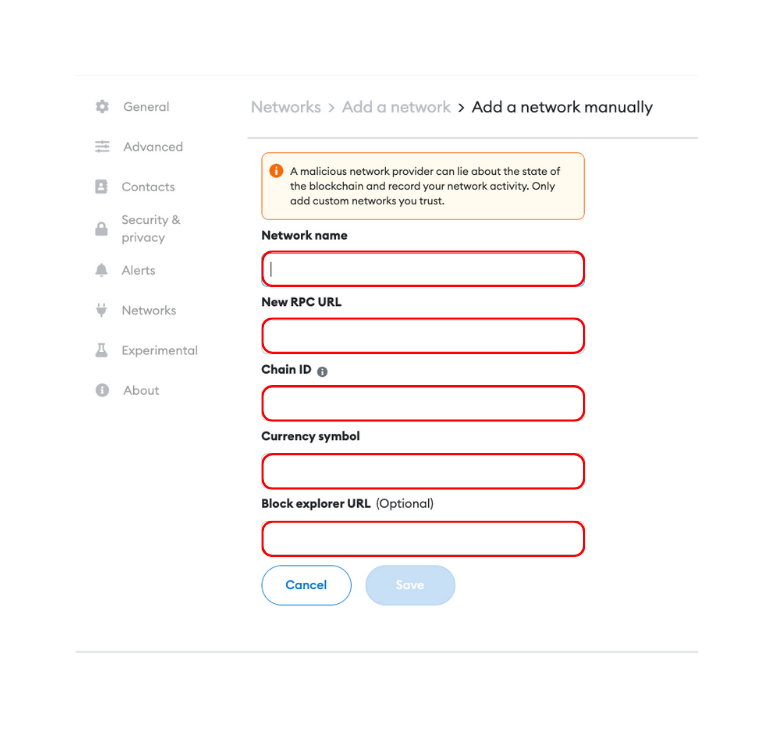
| Network name: | Avalanche Network |
| Network URL: | https://api.avax.network/ext/bc/C/rpc |
| Chain ID: | 43114 |
| Currency symbol: | AVAX |
| Block explorer URL: | https://snowtrace.io/ |
- Latest Articles
- How to Send Crypto on Metamask?
- How to Send Crypto on Trust Wallet?
- How to Add Optimism Network to Metamask
- How to Add the Polygon Network to Metamask?
- Where to Find the Private Key in Metamask?
- How to See BSC Address in Trust Wallet?
- How to Find a Recovery Phrase in the Trust Wallet?
- Is My MetaMask Address Same for Different Networks?
- How to Change Accounts in MetaMask?
- How to Change Networks in MetaMask?
- Where is the USDT Address in MetaMask?
- How to Delete Tokens in MetaMask?
- How to Add the Fantom Network in MetaMask?
- How to Add Custom Token in Trust Wallet?
- MetaMask Alternatives: Top 3 Best Non-Custodial Wallet Extensions
- How to Install and Setup Trust Wallet Extension on Chrome?
- How to Import Account From Trust Wallet to MetaMask in Browser?
- How to Find The Secret Recovery Phrase in MetaMask Extension?
- How to Import an Account in MetaMask with a Private Key?
- How to Add Arbitrum in MetaMask?
- How to Import Custom Tokens in MetaMask?
- How to Import Tokens in Metamask?
- How to See QR Code in MetaMask?
- How to Add BUSD in MetaMask?
- What is Gas Fee on Ethereum?
- How to Install and Setup MetaMask on Android
- How to Change Name in MetaMask?
- How to Get Free ETH in MetaMask?
- Two Ways to Add Avalanche Network / Token in Metamask
- How to Add BNB Network in MetaMask?
- What is a Private Key on The Blockchain?
- What is a Seed Phrase or Secret Recovery Phrase?
- How to Import MetaMask Wallet With Seed Phrase?
- How to Install Metamask on Chrome?
- Forgot MetaMask Password? How to Reset?